Welcome to purepurrfection

Welcome to purepurrfection. My little world. I love to create with psp and photo shop and my dezinz here are always free to download and use. Please enjoy. Here you will find scrap kits and quick pages papers and all kinds of fun creations for everyone. If you like what you see, leave me a hug;).
Please tell others about my my little world and invite them to stop by.
Bratty.
Saturday, April 30, 2011
MY Tag LO from my template and kit Pink to make the boys wink

Morning. Here is my Tag LO from my
template and kit, Pink to make the boys wink
If you like my Dezinz, feel free ti snag and grab
Please leave some hugs if you do;)
Friday, April 29, 2011
Here I have for you My new kit Pink to make the boys wink

Here is my new kit I made to go with
my new template, Pink to make the
boys wink, Loots lots to this kit
Not all shown in preview, Enjoy
Down Load Here
Thursday, April 28, 2011
Here is yet another Template for you

Here is my next Template called
Pink to make the boys wink
Hope you like
Down Load Here

Here is my Lady Bugs Template

Here it is, my Lady Bugs Template you can
down load here ,let me know if you like;)
New Scrap Kit for you Hope you like it

Here I have for you a really cute kit well I think so;)
it is called Little Lady Bugs, Everything is hand made
by me or hand painted. I also made some oil painting
papers for you. I DONT take credit for the ladybugs
credit goes to the original artist, Artist unknown
if anyone claims the ladybugs I will give full credit ty
Download Here
Here is my Paper Preview

If anyone makes something, please show me;)
would love to see it
I also will have a Template for you coming;) so watch for it.
Wednesday, April 27, 2011
Here is my new Template for you If I could build a friend

Here is my new template and extra word art
called If I could build a friend, hope someone likes it
You can down load here
Here is the Extra word art enjoy
Down Load here

Here is my Tag LO from the new template and word art
if you like my Dezinz feel free to snag and grab
Down load here

Sunday, April 24, 2011
Here is my Tag LO from my new template and word art

Here is my Tag LO from my new template and word art
if you like my Dezinz, feel free to snag and grab, let me
know what you think,
Down load here
Here is my extra word art that goes with my new template Jar of hearts

Here is my extra word art that goes with
my new template Jar Of Hearts,
you can down load here
http://www.4shared.com/file/eQpK0dH0/Jar_of_hearts_word_art.html
http://www.4shared.com/file/eQpK0dH0/Jar_of_hearts_word_art.html
Good Morning I have a new template and extra word art for you this morn

you can down load here
http://www.4shared.com/file/zNqC1h_0/Jar_of_hearts_template.html
Saturday, April 23, 2011
Good Morning Here is a mini kit for you called I purr, therefore I am

Good Morning, here is a small kit I made, I created
this kit around the awesome art of Gary Rudisill.
I also created a template which I will post also.
You can DOWN LOAD my kit here
and you can purchase Garys tubes here
https://psptubesemporium.com
I will have new previews up in a few without the shadow tubes,
sorry I did not know you could not have a shadow.
I will have new previews up in a few without the shadow tubes,
sorry I did not know you could not have a shadow.
Here is my Template I also made creating from the art of Gary Rudisill's tube
called Well Hello Kitty

Here is my Template for I purr, therefore I am
DOWN LOAD HERE
And here is my Tag LO I made using my mini kit and template
if you like my Dezinz, feel free to snag and grab.

Friday, April 22, 2011
Good Morning I have a new script for you

Here we have my new script, strand of pearls,
It is a very simple one strand script
you can download the script here
and you can download my instructions and pearl image here
If you like my Dezinz, please leave me a shout Hugs Bratty.
Thursday, April 21, 2011
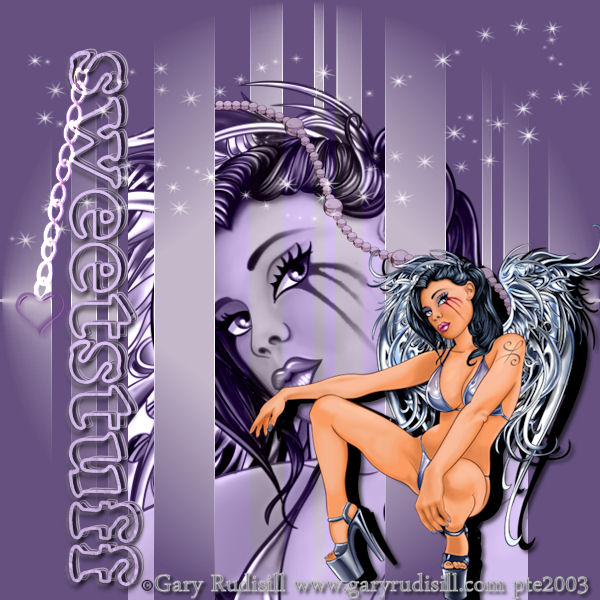
Take a look at my new scrap kit called sweet stuff

Here is my new scrap kit called: Sweet Stuff. I created this kit around
the awesome art work of Gary Rudisill. His Sweet Stuff Tube. Awesome work:) You can purchase his tubes here, and the tube I used to go with this kit;) It is awesome as you can see in my LO tag.
Enjoy
You can down load my kit here
http://www.4shared.com/file/xC-bfi54/Sweet_Stuff_Kit.html
Sorry all I had to remove my previews but will put it back up
in a few with the correction I did not know you could not have
a shadow from the tube. The shadows have all been removed from
both kits an templates
Sorry all I had to remove my previews but will put it back up
in a few with the correction I did not know you could not have
a shadow from the tube. The shadows have all been removed from
both kits an templates
Here is my new Tut sweet stuff
Sweet Stuff tutorial was written by purepurfection.
Please do not copy or claim as your own, thank you
Brattys Dezinz.
Supplies:
Paint shop pro, any version will do.
Tube: I am using the awesome artwork of Gary Rudisill, you can purchase his tubes here
Scrap Kit: Sweet Stuff was made by me, you will
be able to download my kit from my blog here
I made this kit to go with Garys Sweet Stuff tube.
Let’s begin
Open up psp,file, new image, 600x600
From the scrap kit, copy and paste paper number Dezinz 6. Next open up your tube:Note your tube should have a close up image, that is the one we are working with right now. Copy and paste the close up image, center.
Open up the ribbons from my kit, copy and paste, move them both to the center, make sure they are placed in front of your close up tube, see my example for placement.
Open up your tube again, we are using the smaller tube now, copy and paste/re size 85percent. move it over to the right hand side, again see my example for placement.
Next open up my word art, copy and paste and move it over to the left hand side. See my example for placement. Open up the other word art, copy and paste and place it on top of the other word art, moving it off some. Check my example for position. Once your happy
with the word art position, let’s add a small drop shadow, use these settings.
offset 3
horizontal 3
opacity 60
blur 5.00
color black
shadow unchecked
click o.k
Next open up the siloutte(black) girl, copy and paste
re size 85 percent. place behind your smaller tube at the right, offset it a little, see mine for placement.
Add a small drop shadow to the layer. Same settings as before.
Next open up the chain, re size 65 percent, copy and paste the chain, make sure it is on top of the word art, Image free rotate to the right 5.00, click o.k
I changed the color of my chain to match my tube.
Next open up the heart tube, re size, you chose how big or small you like it.:) copy and paste and put it so it is sitting on top of the chain at the bottom.
I added a few extras to my tag, you can too if you like.
Be sure to add the artists info and your lic. number.
Hope you enjoyed my tutorial as much as I did creating it.
Quote: Love.Laugh.Create from your heart.
Brattys Dezinz
Wednesday, April 20, 2011
Here is me showing off;) my LO tag from my template, I can be so mean and new punk kits

Here is my LO tag from my new template
I can be so mean, and from my 2 new kits
punk pink and punk purple.
Feel free to snag and grab
Good Morning. Here is my newest template. I can be so mean

Good Morning scrappers and taggers and tut writers.
Here is my newest template called, I can be so mean,
when my heart is broken.
I made this template to go with my 2 new kits
punk pink and punk purple Enjoy.
If you like my dezinz, let me know, better yet
if you create something, show me.
DOWN LOAD HERE
Tuesday, April 19, 2011
Showing Off Here is my LO tag from my 2 new kits punk pink and punk purple

Here is my LO tag, made from my 2 new kits
punk pink and punk purple. The tube i used was
tubed by nettis.
Here are my new kits you get 2 for 1:) Punk Pink and Punk Purple


Here we have my 2 new scrap kits, punk pink and punk purple
you get 2 for one in one zip Both kits are in one zip
file if you like my dezinz, let me know
taggers and tut writers I would love to
see what you can make;)
DOWN LOAD HERE
Monday, April 18, 2011
Here is my LO tag I made for the Taggers Den Gothic Challenge

Here is my tag I made for the taggers den
gothic challenge, if you like my dezinz
feel free to snag and grab.
Here is my LO tag I made using Staci's template Silence is golden

Here is my LO tag I made using the template
made by Staci, you can find her template on her
blog here. Great template Staci ty
If you like my Dezinz, please feel free to
snag and grab it
Staci's blog here
Update for all who downloaded my beads script

Good Morning all. O.k I forgot to upload
the metal ball last time, sorry I am new
at making scripts. I have updated the 4 share file
with the instructions and the psp image and script enjoy
also in the file I included a bunch of color beads for ya.
also in the file I included a bunch of color beads for ya.
http://www.4shared.com/file/_-lmCIVE/My_Psp_x_Scrpits.html
http://www.4shared.com/file/U7iSeqP4/Beads_silver.html
Ok all now you should have everything;)
http://www.4shared.com/file/U7iSeqP4/Beads_silver.html
Ok all now you should have everything;)
Sunday, April 17, 2011
Here is my LO tag I made from my new template Tell the devil hey

Here is my LO tag I made using my
new template. Tell the devil hey
if you like my work feel free to snag and grab
New template called Tell the devil I said hey

Here is my newest template called
Tell The Devil I said Hey
Hope you like
DOWN LOAD HERE
I am trying my hand at making scripts. Here is my very first one

Good Morning, I am trying script making,
here is my very first try. It is a silver strand of
beads that you can also color, as you can see
in the preview, There are no outside filters used.
Place the script in your script-trusted folder.
Let me know what you think.
DOWN LOAD HERE
O.k not sure about this one Hey I tried lol Girlie Skull Template

Good Morning all, o.K I can;t draw. lol but I gave it a try
with my Girlie Skull Template. It was hard making those bones lol
anyways, maybe someone will like it. If you
don;t like it, just pass lol don't tell me
DOWN LOAD HERE

Thursday, April 14, 2011
Good Morning I have two gifts this morn


Good Morning, Here is my new kit and template,
I made this kit for all my Tagger Den Friends
they are a fantastic group, and all are very
talented, Hope you like my new kit and template
Hope to see any results Hugs Bratty
The kit and template are all in one zip
DOWN LOAD HERE
Wednesday, April 13, 2011
Here is my LO tag from my new kit

Here is my Tag LO from my Punk Princess kit
if you like my work feel free to snag and grab
leave me a message if you do Hugs
Here is my newest scrap kit PunkPrincess

Here it is My brand new scrap kit called
PUNK PRINCESS
if you like my work please let me know, tut writers
and taggers I would love to see you try my new kit.
Enjoy
Download Here
Sunday, April 10, 2011
Sisters Tutorial

Sisters.
Supplies needed-paint shop pro, any version will do
My sister word art you can down load here
Mask of your choice. I am using mask created by cat-370 you can down load them here
The scrap kit I used, is from wishing upon a star, you can visit here blog here,
say thank you when you down load her beautiful kit
Tubes I used you can find here but you must have a license to use her tubes
No outside filters were used, let's have some fun.
Open up psp and the scrap kit, you may chose any paper you like, I chose
paper 13. Lets go to new image/650x530 copy and paste your paper, re size 75 percent.
Next open up the mask, go to layers/new mask layer,/source luminance. Click o.k
Now copy and paste the mask to your paper new layer. Make sure it is centered.
As you can see by my example I colorized my paper, you can too if you like to match your tubes.
Next open up the staircase, copy paste as a new layer, re size 75 percent, make sure it is in the middle, Duplicate, slide this one over to the left hand side so that is is sitting on the edge
of the mask.
Open up the tubes your going to use, re size to fit. Place your first tube halfway
down the stairs, and your second tube should be a sitting tube. Place this one
at the bottom of the stairs See mine for placement. Next pick a flower you like from the kit
Re size 50 percent and place it on the left hand side of the first tube/duplicate, move down
to the second tube/duplicate again/mirror and place next to the second tube on the bottom to the right. Now on your layers pallet, make sure the flowers are under the tube layers.
I also added another flower at the top see mine for placement, Get creative and add the flowers where you like.
Next back to your kit, and get doodle 23, copy paste, re size 50 percent, place it behind the first tube. See mine for placement. Next duplicate, move down just a little /image free rotate/20 percent. Now duplicate again/image mirror, place behind the second tube. See mine for placement
I also added a small drop shadow. That is up to you.
Next open up my word art, copy and paste, again see my example for placement.
If you want to add any extras, you can do that now, as you can see I added a
couple little butterflies, now merge/merge visable. Save as a jpeg/or png.
I hope you enjoyed my tutorial as much as I did writing for you, if you like my
work please let me know.
Again I want to thank wishing upon a star for her beautiful kit and thank you to
cat for her masks.
This tutorial was written by Brattys Dezinz
Saturday, April 9, 2011
Just showing off. Here is a tag I made using my reflections template

Just showing off, here is a tag I made
using my reflections template
if you like my work and like to snag
feel free to snag and grab.
Easter Sunday

Easter Sunday.
Free To Use
Supplies Needed-Paint shop Pro any version will do.
Scrap kit- Easter Memories you can find here on my blog.
Tube of your choice.
Mask by cat-I used mask 276. you can find them here
No outside plug-ins used.
This tutorial is written for beginners in psp.
Step one.-open up the Easter memories kit.
Open up paint shop pro. go to file/new image/650x550
Next go to your tools on the left hand side, chose flood fill tool, and flood fill with white.
Next chose any paper your like, copy paste.
Re size/75percent.
Next open up the mask you chose, make it active layer
go to layers/new mask layer/from image/source luminance checked/ click ok.
Now copy and paste your mask onto the paper you chose. Now you should see the pattern.
Next on your layers pallet, merge/merge visiable.
Now chose a frame from the Easter memories kit
Copy/paste/re size 85 percent. On your layers
pallet make the frame layer active. When you click
on it it will be grey, so you know that is the active layer.
Next open up the tube your going to use,
next go to tools/chose your magic wand.
use these settings.
Rgb value
tolerance-10
feather -0
anti alias checked.
Now use your wand and click inside your frame. You will see the dancing ants. Now at the top go to selections
modify/expand by 2, click ok.
Next copy and paste your tube, and place it inside the ants, go back to selections/invert/ click ok.
I chose a frame with 3 sides, so if you did you can add your tube again the same way to the other open frame.
Follow the same steps as before. see mine for position.
Next we are going to change one or 2 of the tubes, another color. Make one of the tube layers active,
go to adjust at the top/color/hue chose a color you like
by sliding the arrow. then click ok.
Next you can add any extras to your tag as you like. Go to the kit and pick what you like re size 50 percent and paste where you want it to be.
Once your done adding any elements and your happy with the way it looks Go to layers pallet/merge/merge flat.
Save as a jpeg/or png.
I hope you enjoyed my beginner tutorial.
I would love to see your results.
This tutorial was written by Bratty’s Dezinz
Good morning. I made this easy tutorial for beginners in psp. A friend
of mine is just learning. Enjoy.
Friday, April 8, 2011
Good Morning. Here is a my new Template Enjoy.

Good morning, another treat for you. I made this template
to go with my Reflections Tutorial. Hope you enjoy my work
if you do,let me know;) Enjoy
P.s I seem too, write and make my tag and kits,
then make the Template lol .
Taggers and Tut writers. I would love to
see my dezinz used in your tag making or Tuts;)
Thursday, April 7, 2011
Here is another Tut I made Hope you like it

Reflections of a broken heart
Tutorial_Free to use
Supplies needed-paint shop pro I use x pro 3, but any version will do.
I can not supply the heart tubes because they are not mine. So you will
Need to go searching for a heart tube. I used a clear glow heart.
The chain and wire you can find on my blog, in my obsessions kit here
I used the artwork of c.2010-2011 Charlie140588.deviant.com/Howl168155429.Tube of your choice.
Plug-ins I used was simple
This tutorial was written by me, Brattys Dezinz
Now let’s begin and have some fun creating.
Open up paint shop pro, new image 650x214
Grab your flood fill tool and flood fill with a dark color
From your tube.
You will need to re size your tube so it fits nicely in the left
Hand corner. Re size copy and paste your tube, Duplicate/ image mirror
Move to the far right. Layers merge visible
Next go to effects/plug in Simple/quick tile, then Simple again/horizontal grain.
Next copy and paste your tube again and center it in the middle.
Next open up the wire from the obsessions kit, I re sized mine/35 percent
Copy and paste, on your layers pallet move the wire so it is behind your
Middle tube. Duplicate the wire and then image/free rotate/rotate to the left/20 percent.
Click back on your center tube, go to layer pallet/blend modes/ chose dodge.
This will change the way your middle tube will look. You can even try other blends.
Now we need to make the small frame that goes around your middle tube, so.
Let’s go to new image/300x300, next go to your tools on the left and find
The shapes tool. Next click on the rectangle/ then the square.
Chose the dark color from your tube and draw a square.
Make sure before you draw, that you make your background color transparent.
Stroke with 15. Change the vector to a raster layer/right click and convert.
Next copy and paste your frame and place it over your middle tube, now you may have to play around some and re size to fit. Once you like the way it fits. On
Your layers pallet move the middle tube so it is under your frame.
And again play around with it until it is nicely centered.
Add a small drop shadow.
Next open up the chain. Re size 35 percent, and you can colorize it to your liking
I made mine dark grey so that it matches.
Next open up your heart tube. Re size if needed, and place it on top
Of the chain, so it looks like it is hanging. Duplicate/ move it to the other
Part of the chain. See my tag for the example.
Next lets go back to your heart tube, re size it again so it is very small,
I re sized mine about 35 percent. Then copy and paste the heart and move it
To the far bottom left hand corner, Duplicate/ image mirror. You
Should have a heart in both corners now.
Lets go back to the first very small heart , make that layer active, then go to
Effects/simple/ quick tile. Then do the same for the other small
Heart on the right, pretty neat right?
Now again back to the left hand side small heart, make it the active layer, then
on your layer pallet, chose burn, see it made it black. Now lets do it on
the other heart.. Now if you look at your tag you should see small hearts
in all areas.
Now lets make a boarder, go to your tools then go to your selection tool
chose rectangle, with these settings.
Mode: replace
Feather:0
Anti-alias checked.
Now with your tool start at the top/left about an inch wide, and make it so that it goes
all the way to the bottom, then flood fill with your dark color, do the same on the
right side. Selections/select none.
Next go to effects/ texture effects/weave and use these settings
Gap size 1
Width 1
Opacity 100
weave color, use your dark color
gap color/ white
fill gaps checked.
Make the left hand side where you flood filled your color active, then apply the
weave effect. Repeat on the right hand side.
Add a small drop shadow, if you like.
Now for the top and bottom boarders, you will repeat the same steps
as we did for the sides, but your with will be half an inch size.
Now merge all layers, save as a jpeg/ or png.
I hope you enjoyed this tutorial as much as I did creating it.
Brattys Dezinz
Please stop by my blog.
And if you like my work don’t be afraid to say so;)
Subscribe to:
Comments (Atom)